Monday, October 31, 2011

Pumpkin Butter

Happy Halloween! This is the pumpkin my daughter carved (love it). I can't wait to put it out tonight all a-glo! With Halloween and pumpkins on the brain I've been looking for pumpkin recipes, besides the usual muffins, breads, and cookies. 
There was a cute recipe on the Tasty Kitchen for stacked oatmeal to-go: Apple-Pumpkin Butter & Banana Oatmeal jars. It was the "pumpkin butter" that caught my attention. I grew up with apple butter that my mom made (and canned). The recipe I found for pumpkin butter is sweetened with brown sugar and honey. Honey seems very complimentary to this type of dish. I think there's a honey harvest in the fall based on... Google recently tweeting that they had completed their honey harvest.

So how do you chose your spices for your pumpkin butter? I would recommend following your bliss. Start by adding small amounts of what you normally add to "pumpkin pie" and give it a taste. I upped the cinnamon and cloves from the original recipe and pulled the other sprinkling of spices from pumpkin pie recipes. It turned out very autumn-y, and was better the second day.
All of the ingredients in the pan and ready to go.
By the end of the cooking time the mixture thickens a little.

 Pumpkin Butter
1 C Pureed Pumpkin (15 Oz. Libby)
2/3 C brown sugar
1/4 C honey
1/2 t cinnamon
1/4 t cloves
1/8 t nutmeg (fresh grated is nice)
1/8 t ginger
1/8 t mace
1/8 t pure vanilla bean paste

Combine and bring to a boil then reduce heat to low and cook for 20-25 minutes or until thicker. When done, cool. (See Nestle's Very Best Baking for storage tips!) 

Recipe Inspiration: Very Best Baking: Pumpkin Butter (I let my "pumpkin pie" imagination run away with me. I didn't have any lemon juice, but it turned out okay.)

I hope you have a fun Halloween!

Suzanne

Saturday, October 22, 2011

Omelets with Garden Peppers

Last Sunday morning my daughter and I took a walk around Silver Lake which is located at the top of Big Cottonwood Canyon, in Brighton, Utah. Fall is officially here and I wanted to show you.
There's a trail around Silver Lake and it's a popular fishing spot. Near the beginning of the walk you pass a grove of friendly old pines. Back in "the valley" (Salt Lake) fall is everywhere. Pumpkins are spilling out of grocery stores (near the entrances) and Halloween costumes are on the brain so when my husband sent me a photo of peppers, it seemed a little random.
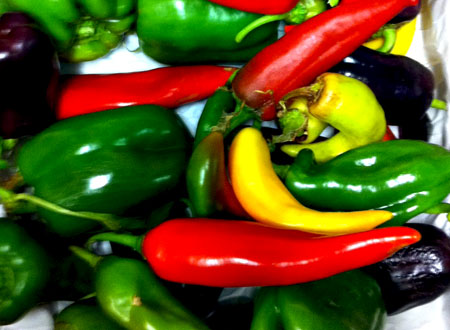
I didn't understand until later, that these little beauties were coming home. One of the guys at his work was sharing the bounty of his garden. (Thank you!) They arrived Monday night and my husband has been asking me why I haven't used them yet. I can see his point, I blog about cooking after all and he  brought home some cool fresh ingredients. So why the hesitation? One big reason: I don't know what kind of peppers they are. They didn't come with a key to heat levels. If you happen to know, please comment. :)
So last night I made omelets and chose three peppers to work with.
I hadn't seen the purple peppers before. They're a pretty shade, like eggplant. Today I'll be chopping up the rest of the peppers to dry in the oven. Last night I sautéed the peppers shown above in olive oil and then added them to our omelets.
Omelets with Garden Peppers
Olive Oil
2 eggs (per omelet)
1 T water
1/2 C peppers (green and red bell peppers, chopped)
2-3 T onion (chopped)
2 Mini Babybel cheese, light (sliced), or 1/4 C grated cheddar (per omelet)

Wash the peppers and clean out the seeds and white membrane. Chop the peppers and sauté with onion in 1 T olive oil using a non-stick pan. Crack 2 eggs into a bowl and add the water and whisk together with a fork. When peppers and onions have cooked put them aside in a bowl. Pour the eggs into the hot pan. It'll look like the eggs are staying wet on the top, don't try to flip it, just use a spatula to lift the edge of the omelet and tilt the pan to lit the runny egg run under the omelet to cook. If you get a hole in the omelet it's no big deal, let the runny egg run into it to cook. Repeat until the egg is mostly set then sprinkle peppers/onions (to taste) over 1/2 of the eggs (covering 1/2 circle). Add cheese over the half of the omelet that you added the peppers to. Sprinkle some cheese along the edge of the omelet so the cheese will fry and get a little crispy. This really makes the cheese flavor "pop!" When the cheese is melting, fold the plain half of the omelet over the side with the peppers, onions and cheese. To get the omelet onto a plate, tilt the pan and allow the omelet to slide out onto the plate (using your spatula to guide it.)

I learned to make omelets from my Betty Crocker cookbook and watching Julia Child. Great teachers! :)

Enjoy!

Suzanne

Saturday, October 8, 2011

Broccoli & Cheese Soup


Did fall seem to come early this year or is it just me? Maybe I just wasn't ready for the cold weather part of fall. I mean I was clued in by the trees changing colors across the mountains--then last week the temperature dropped. We pulled out coats, scarfs and umbrellas, and I put away the sandals I was wearing just a week ago. I think that even the flowers were surprised by the sudden temperature drop.
At work I sit one cubicle away from large windows and have a great view of the Wasatch mountains. The other morning the storm clouds were so thick you couldn't even see the mountains. Around lunchtime the clouds had cleared and the mountains had turned from green to white. It had snowed. Poof. "Insto-presto!" or is that "Presto-Chango?" Welcome to soup weather.
I've been surfing Cooking Light lately for recipes and found a recipe for Broccoli & Cheese soup. As you might imagine, my family is quite patient with my habit of trying new recipes. I had just made this soup when I left to pick my daughter up from a meeting and I came home to hear all about how good the soup was. Everybody liked it! Thank goodness! BTW, I know the "cheese" in the photo isn't the "light" stuff mentioned in the recipe below, but I was lucky to even get it. I never know where to look for it. It's never with the other cheese, right? It's not by the macaroni and cheese either. The bagger ran and got it for me at the checkout, so I didn't learn the secret of where they keep it. Where do they display it?!? Ahem. And now back to the soup...
Broccoli & Cheese Soup
Cooking spray (I used about 1 t olive oil too, because the onion was sticking to the pan)
1 C chopped onion
2 garlic cloves, minced
3 C fat-free, less-sodium chicken broth
1 (16-oz.) package broccoli florets
2 1/2 C 2% reduced-fat milk
1/3 C flour
1/4 t black pepper
8 oz. light processed cheese, cubed (such as Velveeta Light)

Spray stock pot with cooking spray, add olive oil, then sauté the onion and garlic until tender, add broth and broccoli. (I had a 12 oz bag of broccoli and only 1 can of broth so I made up for the fluid with water and chicken bouillon). Bring to a boil then reduce heat to medium, cook 10 minutes. While it's cooking combine milk and flour with a whisk and add to the stock pot. Cook 5 minutes or until it's thickening (stir regularly). Remove from heat, add pepper and Velveeta (cubed) cheese. Stir until cheese melts. Put 1/3-ish of the soup into your blender (I put hot water in the glass blender first to hopefully make the glass hot so it wouldn't crack with the hot soup). Blend until smooth and pour back into the stock pot and stir to combine. Serve.

Source: Cooking Light, January 2002 (They even have nutrition facts with the recipe! Way to go Cooking Light!)

Suzanne
Cookbook Bites
Subscribe to Cookbook Bites (Google, Twitter, Yahoo!, AIM) 
Get posts right to your inbox (Subscribe right below my pic)

Friday, September 16, 2011

Janel's Chile Verde


Why start this post with sunflowers? My sister Janel and I picked some up at the Sunflower Market grocery store earlier this summer after kicking around at the downtown Salt Lake farmers market where we shared Sudanese food, sipped blueberry lemonade and I bought a tomato that was too expensive. And so sunflowers... time with my sister... and we arrive at... her recipe for Chile Verde.

Wait for it... wait for it... "even though..." the original recipe sounded do-able, there was one step I was like "There's no way." ... "You want me to boil it down, how many times?" ... "Really?!?Janel has been mentioned around these parts before for making The Columbia Restaurant 1905 Salad for me after I'd had surgery. She's a nice kind of gal like that. Even though her recipe was already the cat's meow, I didn't think I could handle boiling down a roast as called for so I started thinking... "I wonder if this would work in the Crock-Pot."And then "I wonder if pork chops would work as well as a roast?" And the answer is: "Yes." I've made it twice and I think I've got the Cock Pot version down pat!
The beginning of the Crock-Pot phase below. Everybody into the pool!
And "poof" it's done!

Chile Verde
1 medium size jar of chile verde salsa (verde = green)
2 cans diced chiles (mild)
1 yellow onion
Black pepper (fresh cracked)
1-2 packages of pork chops
1 can of vegetarian refried beans

Add the chile verde salsa to the Crock-Pot. Rinse the jar with about 1/4-1/2 C of water and add the water and the chiles to the Crock-Pot. Next brown the meat, crack fresh pepper on the pork chops while cooking. Cut up the onion in large chunks and add both the meat and the onion to the Crock-Pot. Deglaze the frying pan with water (about 1/4-1/2 C) and add the sauce this creates to the Crock-Pot too. Cook on high for approximately 5 hours. You'll know it's done because the meat will easily come apart with a fork. Add the can of refried beans and stir. Using two forks pull the meat apart into bite sized pieces (or smaller). Allow to cook for 15-30 minutes and serve. 

Serving Suggestions: At our house we serve the Chile Verde as single servings in a bowl, as a hot dip with corn chips. Optional: embellish with fat free grated cheddar, and fat free sour cream.

Source: Janel, my sister (Gracias señorita!), with edits from me.

P.S. A little bit of trivia here, my Crock-Pot will be turning 22 next week.

Sunday, September 4, 2011

Gluten Free Chocolate Chip Cookies

Cookbook Bites: Gluten Free Chocolate Chip Cookies
Gluten free chocolate chip cookies
I'd like to tell you about some chocolate chip cookies I made this week. The cookies went with us on an urban hike to the new "The Commons, City Creek Center" area in downtown Salt Lake City. These cookies are not your everyday chocolate chip cookie. We're doing an elimination diet at our house, dietician led, trying to track down possible allergies that are triggering migraines. First up? Gluten.

My first few tries at gluten free baking has delivered muffins that puff up in the oven then fall to about 1/2 the size. These chocolate chip cookies puff up too, but after they settle they still look and taste reasonably like the real thing (make sure you have a cup of milk when you eat them, they're kind of dry - but if you like a "crisp" chocolate chip cookie, you'll probably like these.) Here are a couple of tips for along the way, then the recipe and a few photos from the morning around town.
Use your favorite vanilla. For me that means Mexican Vanilla Extract. I don't know where to get more of this. I went to their online store and they don't sell it there. (Am I going to need to drive to Minnesota where we bought it? Or Mexico?)
 Cream the butter, sugar, egg and vanilla, just like regular chocolate chip cookies.
 Mix the dry ingredients. Some people sift, I fluff the ingredients together with a fork.
Important Read This PartNext mix the wet and dry ingredients and add 3/4-1 bag of mini chocolate chips. Based on comments I read at All Recipes I did a test cookie at first, and my first cookie (even though the dough looked like normal cookie dough) spread into a lace-cookie. So I added more gluten free flour until I couldn't get any more to mix into the dough, then I tried it again, and it worked! I made little round cookies and pressed them down just a little with a spoon before baking, but it looks like they would have spread anyway.
Gluten Free Chocolate Chip Cookies
3/4 cup butter, softened
1 1/4 cups packed brown sugar
1/4 cup white sugar
1 teaspoon gluten-free vanilla extract (Mexican Vanilla)
1 egg (the original recipe called for egg substitute)
2 1/4 cups gluten-free flour (Bob's Red Mill Gluten Free All Purpose Baking Flour)
1 teaspoon baking soda
1 teaspoon baking powder
1 teaspoon kosher salt
3/4 bag mini semisweet chocolate chips

Preheat your oven to 375 and butter your cookie sheet. Mix butter, sugar(s) and egg. (I mixed this by hand with a wooden spoon. The dietician mentioned if you use your regular mixer the wheat flour dust from earlier baking projects could get into the gluten free dough.) In a separate bowl add gluten free flour, baking soda, baking powder and salt and stir with a fork. Combine the butter and flour mixtures and add the chocolate chips. If you're worried about the cookies spreading to much, bake a test cookie so you can see how it'll come out. If it spreads too much add a spoonful or two more gluten free flour. I added more flour until the dough just didn't allow me to add any more (like 1/2 C) you don't want the dough to be in crumbles. Drop cookies by the spoonful (you may need to sort-of help shape them by hand) onto a buttered cookie sheet and bake for 8-10 minutes. Cool 2-5 minutes before removing from the cookie sheet.

*A Note About Ingredients: To really make sure what you're baking is gluten free check the ingredient lists for the items called for in the recipe.

Recipe Source: All Recipes: Chocolate Chip Cookies (Gluten Free) by Barbara Arnold

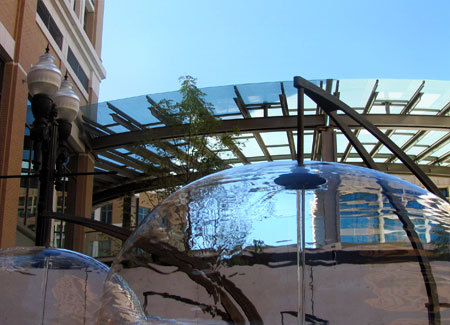
We took some of the chocolate chip cookies with us downtown for a Saturday morning photography trip; homework for my daughters digital photography class. Not all of us are on a gluten free diet, but the cookies are family friendly! Here are some pics I took while she was doing homework.
 We've got a fancy new skywalk right in the middle of downtown. Very metro.
 Urban forest and parking.
 Fountain at the "City Creek Commons."
 Another very cool fountain.

Good luck with the cookies!

Suz

LinkWithin

Related Posts Plugin for WordPress, Blogger...